
The Old Favourite, also known as the Kilfenora Jig, is a lovely tune to work on with a guitar beside you. In this lesson my dad, Mick Coyne, plays it on whistle in G. We’ll start with the jig rhythm and the main chord shapes, then use a couple of moving bass lines to give the accompaniment more shape.
Have a listen to the opening performance before you start. You don’t need every slide or hammer-on straight away. Get comfortable with the tune first, then choose one extra movement to bring into it.
Tap a timestamp below to jump to that part of the lesson.
Watch on YouTube if the player does not load.
Before you start: DADGAD, capo 5 and chord names
Tune to DADGAD, from the lowest string to the highest, and put your capo on the fifth fret to play along with Mick in G. Use my DADGAD guitar tuner to tune the open strings before putting on the capo. If the tuning is new to you, keep my DADGAD chord guide beside you for the first shapes.
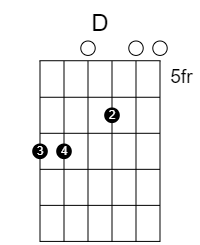
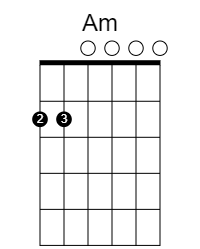
The chord names in this lesson are the sounding chords with capo 5. The familiar D-shaped fingering therefore gives us G. Read the fret positions on these diagrams from the capo, rather than from the nut. Open circles mean strings left open above the capo; crosses mean strings to leave out. Numbers on the dots show the fingers.
Follow the full chord chart
Keep this chart beside you as you work through the lesson. A1 and A2 are the two passes through the A part; B1 and B2 are the two passes through the B part. Each box is one bar. Where two chords share a box, follow the change in the video. The last bar of B2 has D before returning to G.
The Old Favourite · G · DADGAD, capo 5
Read each part left to right: bars 1–4, then 5–8.
The chart gives you the route through the tune. The diagrams below show the individual shapes and the extra movements used along the way.
1. Get the double-down jig rhythm comfortable
Count 1 2 3, 4 5 6. The strum is down up down, down up down. Notice the two downstrokes beside each other as you move from the end of one group into the start of the next. That’s the double-down rhythm.
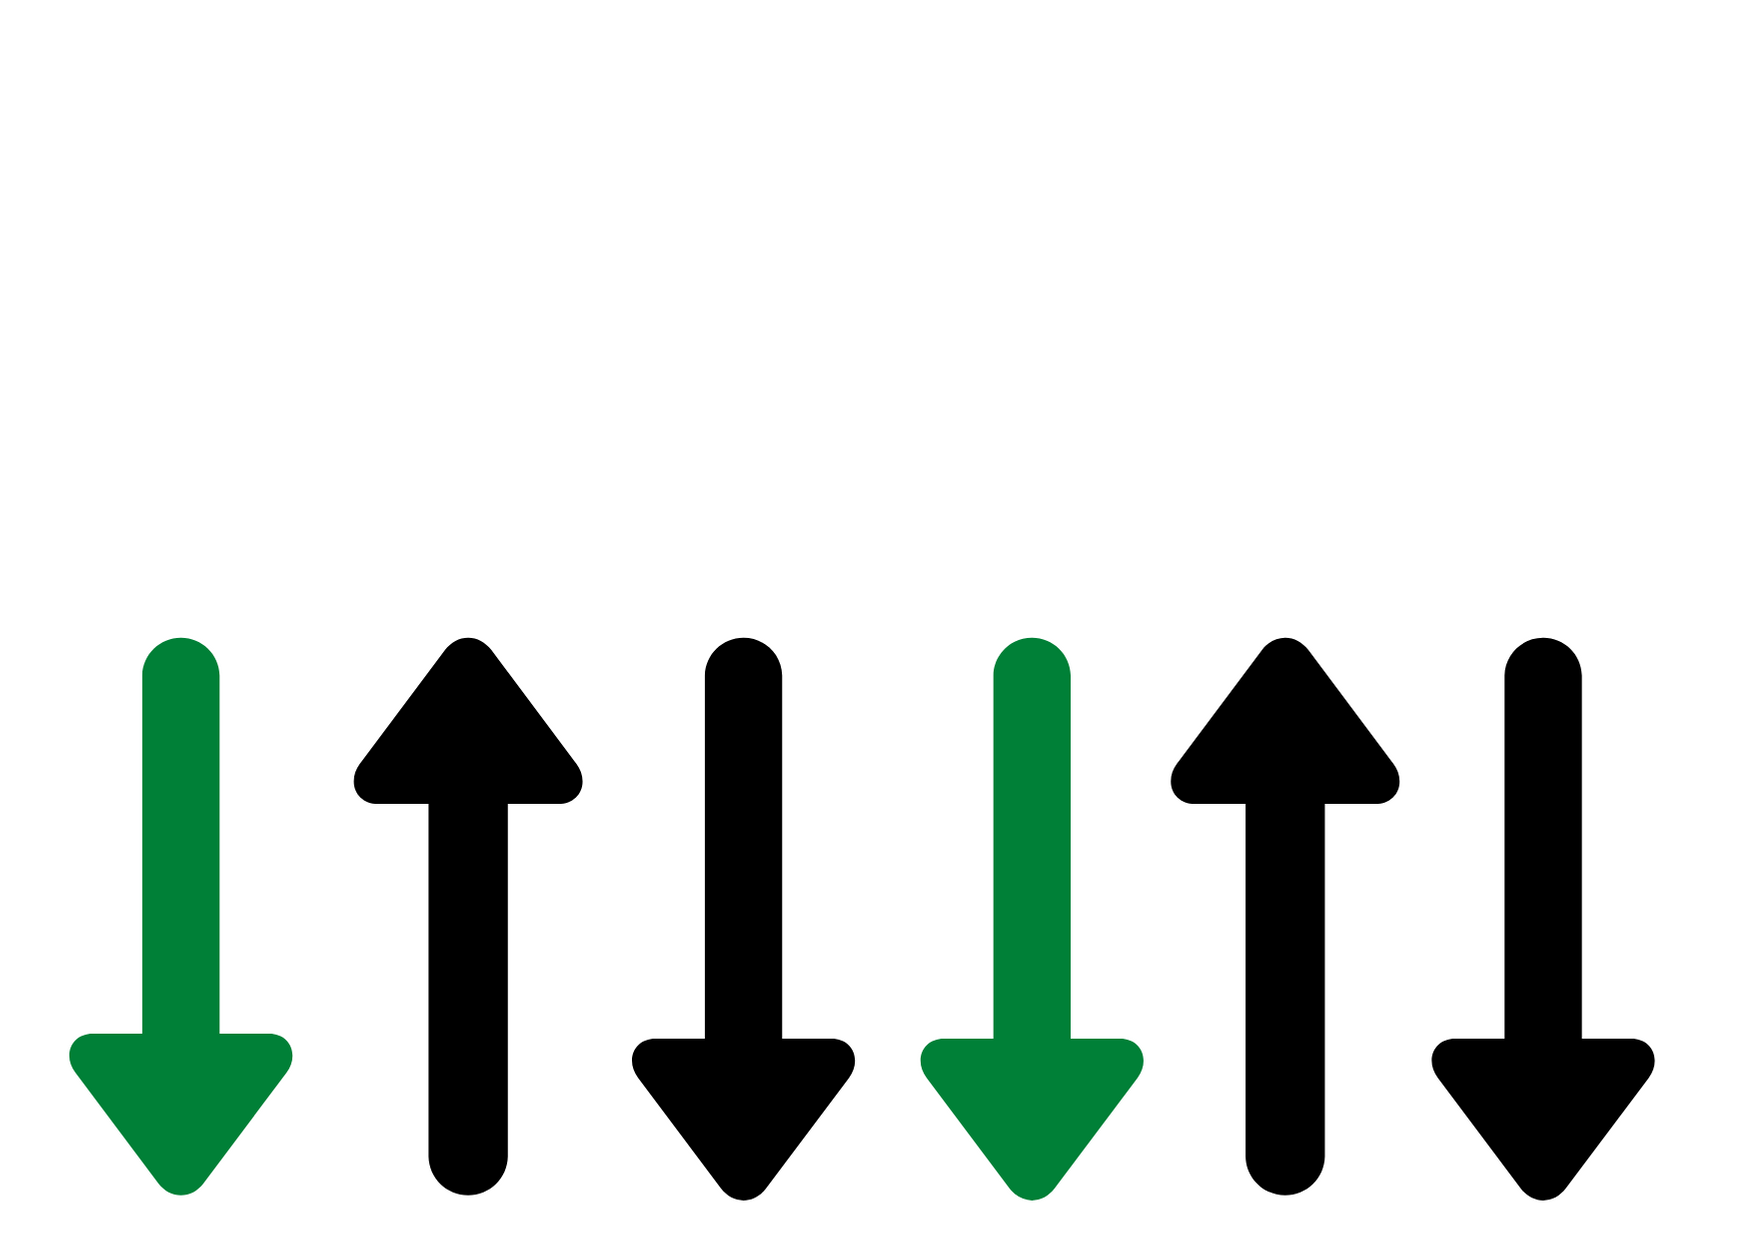
Stay on one chord while you get that movement comfortable. Once it is steady, listen to Mick and try changing the emphasis within the rhythm. Let the melody guide the lift, rather than making every stroke equally heavy.
2. Learn the A-part chords
Start with G, then move through C and D
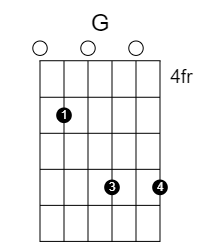
The first G uses a D shape, with the little finger added on the lower strings. Keep it ringing while you settle into the rhythm. The C shape then moves up the neck to make D. Practise that move on its own before putting it back into the phrase.


Two ways to play the Am
The straightforward Am uses two fingers on the lower strings. There is also a useful alternative that lets you keep the little finger in place from the G. Try both and notice which makes the return to G feel easier. These are choices within the same accompaniment, so you only need one to begin with.

The A1 and A2 lines use the same chord pattern. Follow the slow explanation, then join the performance without adding the later bass runs yet.
3. Give the B part some moving bass
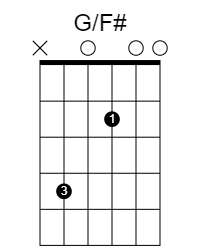
The lower walk: G, G/F♯, Em and G
The B part starts by letting the bass move down. From G, the F♯ is a passing bass note on the way to E. We then come back to the simpler one-finger G before moving through C and D.
Keep the right hand going while you practise the lower movement. The interest comes from that bass line travelling underneath the tune; you don’t need to hit every string harder to make it heard.


The higher walk: Em, D, C and G/B
The next descent starts from a higher Em shape and comes down through D and C to G with B in the bass. Use the D and C diagrams above alongside these two new shapes. Listen for the line E, D, C, B within the accompaniment.

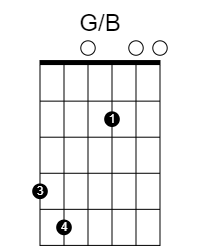
Take this little run out of the tune and repeat it slowly. Then do the same with the lower run. Once each one feels comfortable, link them back into the B part. Listen to the two endings too: the second time, the C moves up to D before the final G.
4. Add a little colour when the backing is settled
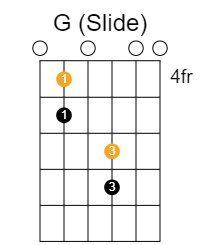
Slide into another G shape
A slide into the higher G gives you another way to build a phrase. Follow the movement in the video rather than trying to press every marked position at once. The coloured dots show stages of the movement.
Try the hammer-on, then listen for space
The hammer-on is another small addition to the G. In the demonstration I move from the third finger to the little finger. Let the first note speak, then bring the little finger down clearly. Keep it within the rhythm rather than stopping the backing to fit it in.

You can also hear some picking-hand muting and small melodic movements towards the end of the explanation. If you’d like to explore those notes, the inside skeleton scale lesson is a useful next step. Pick one idea and try it where it suits Mick’s phrase.
The Old Favourite and the Kilfenora: a little context
You may come across this tune as The Old Favourite, The Old Favorite or the Kilfenora Jig. There are different settings in circulation, and some references classify a version as a slide. For this lesson, follow Mick’s jig performance in G; another recording may use a different key or feel.
For notation, tabs and alternative chord choices, open The Old Favourite on IGA TradChords. Treat those alternatives as another resource to explore, rather than an exact transcription of this guitar arrangement. The Session’s tune page and the Irish Tune Index provide more background on the names and settings.
Learn the melody with tabs and notation
If you would like to learn the tune itself as well as the backing, my separate Old Favourite melody lesson with tabs, notation and chords gives you another way to work with it. It is a separate lesson, so treat its chord suggestions as another arrangement rather than an exact copy of the accompaniment above.
Finish by accompanying Mick on your own
At the end of the video, Mick plays the tune three times without my guitar. Use that to put the parts together: one time with the basic backing, then another with a bass run you have practised. If the rhythm becomes uneven, leave the extra movement out and get back beside the melody.
For a handy reference while you’re playing, get my free DADGAD Cheat Sheet. You can also keep the DADGAD chord guide beside you as you become more familiar with the tuning.